Eulogy

30 07 2017


Remembering Susan Rogers-Aregger (June 28, 1951-July 2, 2017)

We were all blessed to know Susan and share her life. I will cherish her friendship always. Susan was my friend, teacher, and colleague. She taught me most everything I know about making art with tissue paper, marketing and selling art, and how to run an art gallery and co-op—all of which I have managed to do over the many years we knew each other.

I want to tell you about a bond we had. We had the same mentor, the colorist Gloria Foss. Since Gloria’s passing, Susan carried on her legacy of teaching collage; and I continued Gloria’s method of teaching oil painting and how to turn the form. Susan co-authored their textbook entitled Paper Dyeing for Collage & Crafts, and I had the privilege and honor of doing many of the photographs for How to Paint by Gloria Foss. We both loved to quote her to our students in class: “Gloria says . . .” Ahaha. But we go back further than that.

I first saw Susan when she was introduced by Ramsay Goldstein at a meeting of the Honolulu Branch of The National League of American Pen Women. At that time she was working at Ramsay Gallery in Chinatown. She flashed her big, cheerful smile, that toothy grin, happy to meet other artists, writers, and composers. I could see instantly that she was someone special. She looked like she would be good fun!

At that time I was a Letters member only, working with words, not images. Susan joined as an Art member. The Pen Women Art members were such an inspiration. I gravitated to learning about color and how to paint—from Gloria! Shortly after I had the guts to hang my paintings at the Honolulu Zoo Fence, Susan invited me to join the Arts of Paradise Gallery at the International Market Place, and the rest, as they say, is history.

I remember one day when Susan called and told me how sick Gloria was and how she was at her bedside urging her to hang on to life. No luck. Similarly, when I visited the Aregger home it was two days since Susan had lapsed into a coma. Dan and her hanai sister were there, as were two caregivers. The doctor had left, and they said he would come again the next morning. It was a beautiful day as I watched their whirligig in the wind on the beach, the wind blowing the clouds and the palm fronds, too, reminding that life is a continuum. I gave Susan some Reiki.

Hawaii’s poet laureate Don Blanding (1894-1957) wrote this poem I would like to share:

“Somehow”

I’ve tried for many an hour and minute
To think of this world without me in it.
I can’t imagine a newborn day
Without me here . . . somehow . . . someway.
I cannot think of autumn’s flare
Without me here . . .alive . . . aware.
I can’t imagine a dawn in spring
Without my heart awakening.
These treasured days will come and go
At swifter pace . . . but this I know . . .
I have no fear . . . I have no dread
Of the marked day that lies ahead.
My flesh will turn to ash and clay
But I’ll be here . . .
Somehow . . .some way. —Don Blanding

Rebekah Luke
July 30, 2017
Ho‘omaluhia Botanical Gardens, Oahu


Grapes and drapes painting lesson

5 09 2012

Grapes and drapes still life setup, Painting II, Rebekah Luke, instructor.

Today my Painting II class is painting “Grapes and Drapes.” This lesson, originally from Gloria Foss, is practice in the studio for painting the Ko‘olau Mountains and trees in the landscape later on.

We pay attention to where the light is coming from in the scene and turn the form with values from light to dark.

We review the “Tomato Theory” we learned in Painting I, that is lightening and darkening the form with colors that are analogous on the color wheel instead of adding white or black, or instead of adding the complement to darken. In addition, we remember the mantra, “Warm it in the light; cool it in the shade.”

“Tomato Theory” can be a hard to get used to at first, but practicing it makes objects pop with vibrance and gives the overall painting more pizazz.

I find it satisfying to be able to pass on the techniques I learned from my own teachers Vicky Kula and Gloria Foss. What they taught me and what I am passing on to my students is the logic of light.

Copyright 2012 Rebekah Luke


Is painting on your bucket list?

4 01 2012

Painting is on my friends’ bucket lists. They’ve inspired me to teach some fundamentals and techniques and offer a course. As promised, I will open my Kaaawa studio for Oil Painting Lessons starting February 2012. Registration is open now and enrollment is limited.

The “Painting I” course consists of 12 weekly lessons on Wednesday from February 1 to April 25. Class sessions will be from 10 a.m. to 3 p.m. and include a lunch break. Tuition is $100 a month. Cost of materials is additional.

I just noticed it’s leap year, so you’ll either get a bonus or won’t have to feel bad if you miss one class.

Students will learn impressionistic painting in oil. Lessons will generally follow those taught by the late colorist Gloria Foss, my oil painting teacher, and as found in Foss’s guidebook How to Paint. I’ll add my own experience as a fine art painter and photographer to show you what to do.

I’ll teach you art fundamentals and the logic of light to give you a solid foundation to pursue painting as an avocation or a vocation.

What you’ll learn

Here’s just some of what you’ll learn in my Painting I:

• Basic drawing — perspective, shape, value, light and shadow
• The world in black and white
• Basic color theory—monochromatic, analogous, complementary color and full palette
• Using color charts and the color wheel
• Modeling of forms

Each lesson will consist of a brief lecture on art theory, a demonstration, hands-on still life drawing and painting in the studio, homework, and critique.

Each week we will build on the previous technique learned, and eventually we will apply what we have learned in the studio to the landscape.

Gloria Foss and me

I first met Gloria Foss at the Honolulu Branch of the National League of American Pen Women where she was an Arts member and I was a new Letters member. She was a UH Mānoa student getting her Master of Fine Arts degree. She wanted to teach. She said if all of her art teachers had explained some things from the very start, it would have been a lot easier. She was about 60. Teaching was on Gloria’s bucket list!

After I finished the black-and-white photography curricula at Art Center College of Design in Pasadena (I didn’t complete color photography), I sought a studio class to keep my eyes trained. By then Gloria had designed her own “Gloria Foss Color Course” and opened the Foss School of Fine Arts in Honolulu.

Then I had the honor and delight of making the photographs of the studio lessons in her book How to Paint. It’s now my desire to share what I learned, then and since, with others.

Tuition, materials and supplies

Your investment will be the cost of tuition—$100 a month for each of three months for a total of $300—plus the cost of materials and supplies. When you register, you will receive a complete list of art materials to buy.

For the first two or three lessons, you will not need everything on the list. All items on the list will cost an estimate of $125-$150.

Easels will be provided for class use.

An optional text is How to Paint by Gloria Foss (New York: Watson-Guptill Publications, 1991) that will be used for reference. It is out of print, but you can try to locate a used copy. Information on how to obtain a CD of the book will be given in class.

How to register

To reserve your place in class, send your correct name, mailing address with ZIP, phone number, and email address with a minimum $40 deposit to Rebekah Luke, P.O. Box 574, Kaaawa, HI 96730. Or, include the information in an email message to rebekahluke@hawaii.rr.com and send your deposit via PayPal with the DONATE button in the right sidebar. After your deposit is accepted I will send you a supplies list and information on where to go in Kaaawa for the first class. Happy painting!

PAINTING I February 1-April 25, 2012
Copyright 2012 Rebekah Luke


A fresh look at the art of painting green

20 10 2010

Some painters claim they don’t know how to paint green. It must be why paintings of this hue are generally absent in the art galleries. In this post I’ll show how to paint green. With oil paint, the trick is to change your base color.

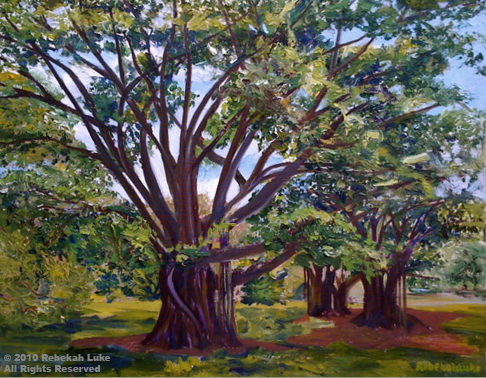
I love green. “Banyan in the Park” and “White Ginger,” two of my most recent paintings, are predominantly green. Looking at them gives me a feeling of calm, coolness, and serenity. More so, I can recall the satisfying experience of choosing the images and transferring them to canvas. I can smell the sweet scent of the ginger patch.

Banyan in the Park

White Ginger

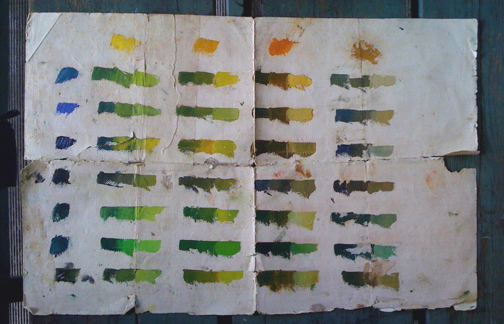
Painting green is no secret, it’s a technique. As mentioned, it’s all about changing your base, your base being a yellow or a blue because yellow plus blue equals green. In the field, I still use a color chart I made when I took my first painting classes. Someday I’ll paint a new one!

My green color chart on canvas paper, a bit ragged but still useful!

You can make a chart like this too. Use a palette knife. Put a swatch of each of your yellows in the top row. Down the left column, dab a swatch of each of your blues, including black if you use black. The greens in the body of the chart are the result of mixing a blue with a yellow. For each combination of the two colors, I have added white two times to get a “light,” “middle tone,” and “dark” of the same hue. See how many different greens there are!

When I am on location, I literally walk up to the object—e.g., a leaf—and find the swatch on my color chart that most closely matches it, eliminating any guess-work. If the object is in the distance, I hold up my palette knife—with paint on it—in the air in front the object and squint to see if the hue and value (lightness or darkness) match. When you paint a green scene, step back for a moment now and then. If it’s starting to look all the same, maybe it’s time to change your base to “find” another green.

Going a step further beyond the colors on the chart:

To lighten, “warm it in the light,” that is, add the next lighter yellow from your palette plus a little white. To darken, “cool it in the shade,” that is, add the next darker blue from your palette.

This technique of warming it in the light and cooling it in the shade is known as “analogous,” meaning to use the next color on the color wheel. In the way I paint, I prefer analogous to “complementary.” Adding the complement—the color opposite on the color wheel—to a color will also darken, but it will also appear comparatively chalky. Put another way, if I want to darken green, I add blue, not red.

If you are still with me ;-), here are a couple of exceptions.  When painting a landscape, colors become muted and lighter in value in the distance. In this case the painter would choose complements. Realize, also, that whenever you see gray, use the complement.

I learned these tips from my teachers Gloria Foss, Vicky Kula, and Peter Hayward who taught us how to turn the form and about the logic of light.

Thank you!

Copyright 2010 Rebekah Luke